SSH Connection
The most traditional method of connecting to Unity is using an SSH connection. SSH stands for “secure shell”. A shell is the terminal, or Command Line Interface (CLI), that you type commands into. The most common shell in Linux is bash, which is most likely what you will be using in Unity.
This guide will show you how to generate your SSH keys, store your SSH keys in the correct location, and use them to connect to Unity through either the Command Line Interface (CLI) or PuTTy for Windows users.
Part 1: Generate SSH Keys
The authentication method we use for SSH connections is with public/private RSA keys. You can read more about the public/private key exchange here.
There is a public SSH key that is stored on the server, and a private SSH key that you keep on your local computer. Think of them like your name and your social security number, respectively. In order to login to Unity, you need to authenticate the public key with your private key.
Use the following instructions to generate and save your public key on Unity:
- Go to Account Settings in Unity.
- Under SSH Keys, click the Generate Key icon, or ’+’. The public key is added to our database, and the private key downloads to your computer.
Part 2: Store SSH Private Key
Once you have generated your public and private keys, move the downloaded private key into your home
directory’s .ssh folder. The .ssh folder path name is:
C:/Users/YOUR_NAME/.sshin Windows/home/YOUR_NAME/.sshin Linux/Users/YOUR_NAMEin Mac
In the terminal, a shortcut for this directory is the ~ symbol.
To move the private key to the appropriate directory, use the following command:
mv ~/Downloads/privkey.key ~/.ssh/unity-privkey.keyThis command works for any operating system since it uses the
~symbol as the directory shortcut.Linux and Mac users: use the following command to change the permissions on the file due to its importance to security.
chmod 600 ~/.ssh/unity-privkey.keyRecommended: add a password to this file using the following command.
ssh-keygen -p -f ~/.ssh/unity-privkey.key
Part 3: Connect to Unity with SSH connection
The following instructions will show you how to connect to Unity using the SSH keys that you generated and stored. There are two different methods outlined below:
Option A: CLI users can connect to Unity through the terminal, or Command Line Interface (CLI), on any operating system. This option is the recommended method.
Option B: Windows users can also use PuTTy to connect to Unity.
For both methods, you will need the following information about your Unity account:
- Hostname/Address:
login.unityhpc.org - Username:
username_school_edu
<organization username>_<organization>_edu.
View your username here.Option A: Connect to Unity using the CLI
We recommend connecting to Unity through the CLI, or terminal. Windows, Mac, and most distributions of Linux come with the OpenSSH client, which you can use to connect to Unity in your terminal. The following sections include instructions on how to connect to Unity in your terminal using the SSH connection established in Part 1: Generate SSH keys and Part 2: Store SSH private key.
First, make sure that the OpenSSH config file exists and contains the correct information using the following steps:
- If the file
~/.ssh/configdoesn’t exist, create it. - Copy the following contents to your Notepad if it is not already there:
Host unity
     HostName login.unityhpc.org
     User <username>_<ORGANIZATION>_edu
     IdentityFile <PATH_TO_PRIVATE_KEY>
Windows users using PowerShell SSH only must add MACs hmac-sha2-512-etm@openssh.com to their ~/.ssh/config file, or use the flag option in your SSH command so that it reads ssh -m hmac-sha2-512-etm@openssh.com <rest of the cmd>.
This is necessary due to a known bug in Microsoft’s SSH library which causes problems connecting to newer OpenSSH installs from Microsoft’s SSH client included in PowerShell.
- Be sure to replace
<username>and<PATH_TO_PRIVATE_KEY>to your specifications and save the file in a directory of your choosing, without an extension.
Move and rename the OpenSSH config file
You may need to move and rename the config file, which can be challenging since the user-friendly methods are less cooperative with files that don’t have an extension, and the ssh config file cannot have an extension. The most reliable way to rename or move your OpenSSH config file to the correct location is to use the mv command, as demonstrated in the instructions below.
- Windows Notepad adds the
.txtextension even if you choose the ‘All Files’ option when saving. - Mac TextEdit doesn’t include the option to save a file as
.txt. To make your current file plain-text formatted, use⌘-⇧-T. Then, you can add plain-text as a ‘Save as’ option in the config.
To move your OpenSSH config file to the correct location with the mv command, use the following instructions:
Open your terminal.
To move and rename the Open SSH config file successfully, use the
mv(move) command as shown in the following example:mv path/to/source-file path/to/destination-fileWith the source and destination file paths filled in, the command might look something like this:
mv ~/Desktop/ssh-config.txt ~/.ssh/configThe
mv ~/Desktop/ssh-config.txt ~/.ssh/configexample above assumes that the SSH config file is in the Desktop folder, and needs to be moved and renamed to~/.ssh/config.
Connect to Unity in the terminal
Once the OpenSSH config file contains the information for Unity and is in the correct location, you can connect to Unity through the terminal using the following instructions:
- To begin connecting, type the command
ssh unityinto your terminal. - As shown in the image below, the system asks you if you are sure you want to continue connecting. To continue, type
yes. The large Unity logo appears to show you that you have successfully connected to Unity.
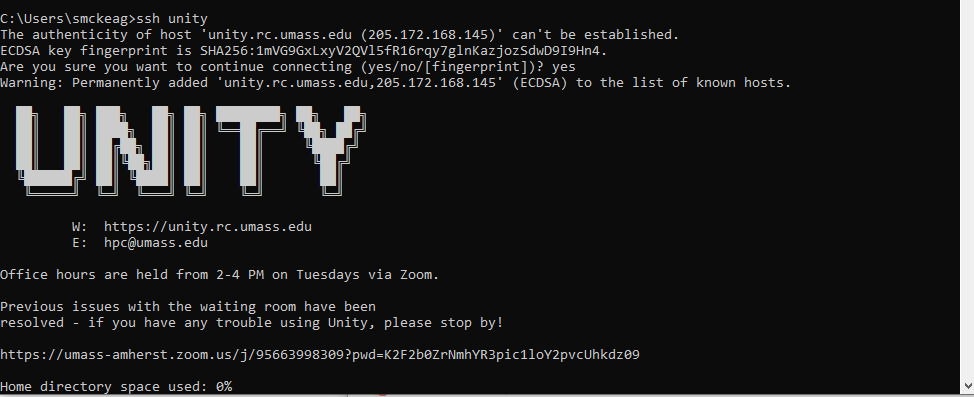
Using SSH to connect to unity
Option B: Connect to Unity using PuTTy (Windows users only)
Windows users can use PuTTY to connect to Unity. Download and install PuTTy to get started.
Connect using PuTTy
- After PuTTy is downloaded, open PuTTY and enter the hostname
login.unityhpc.orgon the main page.
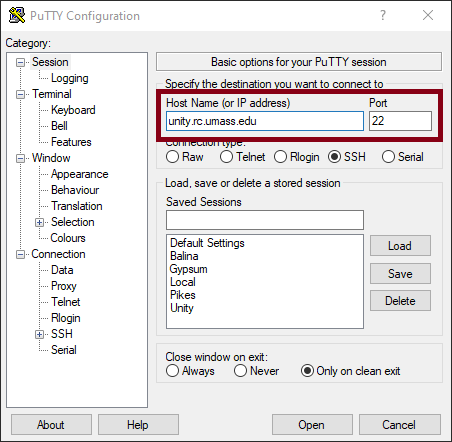
Configuring Host in PuTTY
- On the left sidebar, click Connection > Data.
- In the box next to Auto-login username, enter your Unity username.

Configuring Username in PuTTY
- On the left sidebar, click Connection > SSH > Auth.
- Click Browse… and locate your private key location.
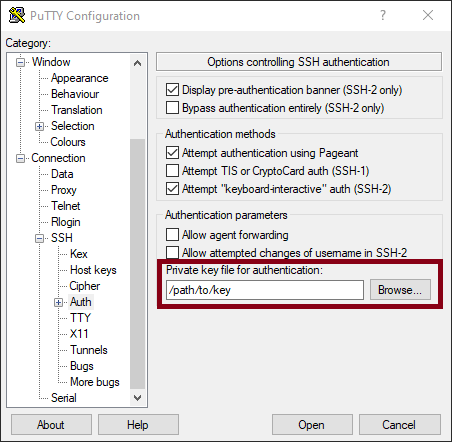
Configuring SSH Key in PuTTY
- On the left side bar, click Session to go back to the main page.
- Under Saved Sessions, type Unity as the profile name.
- To save the profile you created, click Save. Your profile saves so you don’t have to enter this information every time you want to connect to Unity.
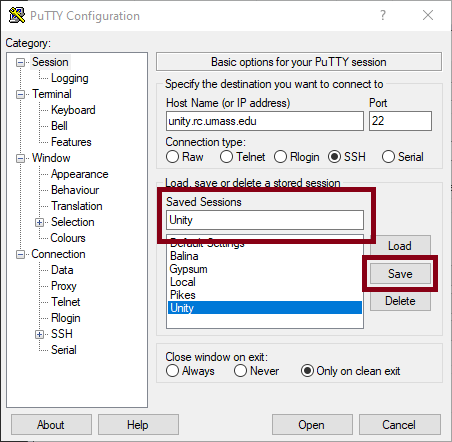
Saving PuTTY Settings
Recommended: Configure an SSH agent
We recommend configuring an SSH agent, a program that stores your SSH keys in memory, so you don’t need to enter your password every time you use those keys for SSH connection. The following instructions will guide you through how to configure an SSH agent as a macOS user, a Windows user using the CLI, or a Windows user using PuTTy.
MacOS
The macOS Keychain app acts as an SSH agent. To enable it, add the following lines to your ~/.ssh/config file:
UseKeychain yes
ForwardAgent yes
Windows (CLI)
Windows provides the SSH agent as a service. You can enable the agent via the PowerShell CLI or the Services application.
Option A: PowerShell CLI
- Start PowerShell as an administrator.
- Run
Get-Service ssh-agent | Set-Service -StartupType Automatic -PassThru | Start-Service.
Option B: Services application
- Search for and run the Services application.
- Find
OpenSSH Authentication Agent - Right click and select
Properties. - Change the
Startup typetoAutomatic. - Press
Start.
Verify that the SSH agent is working
In a macOS Terminal or a Windows PowerShell, use these commands to make sure the agent is running. Adjust the name of the key to match the name you used in Part 2:
ssh-add ~/.ssh/id_rsa
ssh-add -l
If it says Error connecting to agent, then it has not started properly.
Windows (PuTTY)
PuTTY uses its own Putty Agent and is not compatible with the ssh-agent service.
- To launch the Putty Agent (
pageant.exe) and load the key, double-click on the.ppkkey file. - On the configuration screen, go to Connection > SSH > Auth.
- Select Attempt authentication using Pageant and Allow agent forwarding to enable those options.
- Back on the Sessions screen, select Unity.
- Click Save.
To start the Putty Agent at startup:
- Press
Windows+Rto bring up the Run dialog. - Type
shell:startupand pressEnter. - While holding
Ctrl+Shift, drag your.ppkkey file into the Startup folder. It should say “Create link…” in the tooltip.